· Tutorials · 7 min read
Multi-container application with SQL Server
Build a multi-container application with SQL Server and ASP.NET Core using Docker Compose while using Docker Volume to persist the data and environment variables to form the connection string to connect to the database.
Introduction
In the previous beginner series for docker, we saw how to build a multi-container application with SQL Server and ASP.NET Core using Docker Compose. We built a really simple application and then ran two containers, one for the web application and one for the database. However, if you notice carefully, we actually didn’t connect the two containers together, we just ran them side by side. In real world, we need the containers to talk to each other.
So this time, we will be building a multi-container application with SQL Server and ASP.NET Core using Docker Compose while using Docker Volume to persist the data and use environment variables to form the connection string to connect to the database.
Prerequisites
Clone the starter code from this GitHub repository or apply the steps in this post to your existing project.
Setup Overview
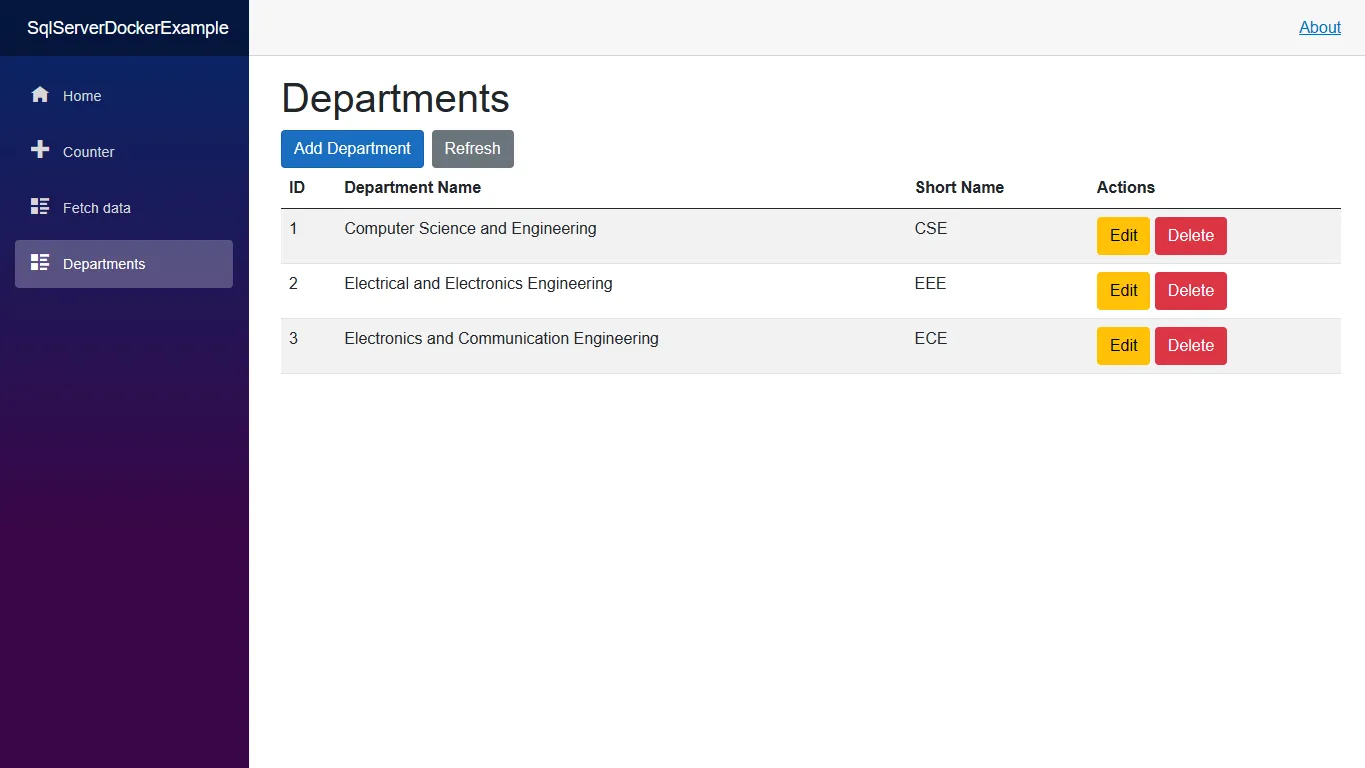
In the starter code, you will have an ASP.NET Core Blazor Server App that works automatically, if you have SQL Server LocalDB installed already. If you don’t have SQL Server LocalDB installed, the app will fail to start for now. Nevertheless, we are going to reconfigure the app to use SQL Server in a container instead of LocalDB.
The app contains a simple set of CRUD operations to manage a list of departments and uses Entity Framework Core to interact with the database.
Objectives
The primary objectives of this post are as follows:
- Use Docker Compose to run the app in a container and connect it to another container running SQL Server
- Use Docker Volume to persist the data in the SQL Server container
The final architecture of the application will look like this:
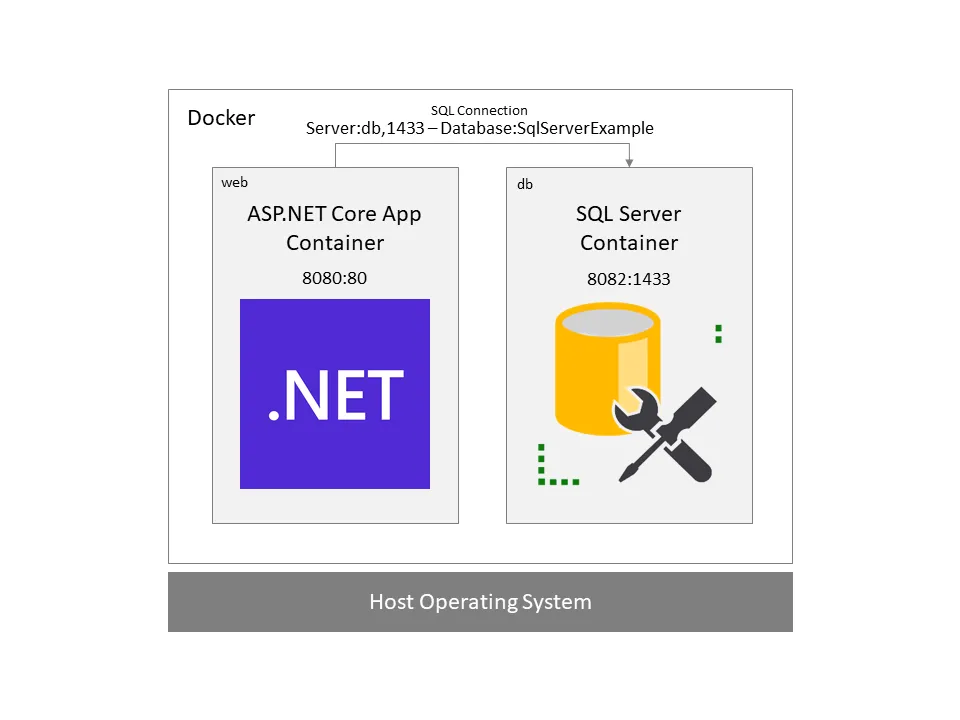
We should be able to use the application at http://localhost:8080
Game Plan
From the starter code, we will setup the following:
- Create a
Dockerfilefor the ASP.NET Core Blazor Server App - Create a
docker-compose.ymlfile for container orchestration - Add Services for the ASP.NET Core Blazor Server App and SQL Server
- Create a Docker Volume to persist the data and configure the SQL Server container to use Docker Volume
- Setup environment variables for the connection string
Setup Dockerfile for the ASP.NET Core Blazor Server App
Create a new file named Dockerfile in the src/SqlServerDockerExample folder and add the following content.
FROM mcr.microsoft.com/dotnet/aspnet:7.0 AS base
WORKDIR /app
EXPOSE 80
EXPOSE 443

FROM mcr.microsoft.com/dotnet/sdk:7.0 AS build
WORKDIR /src
COPY ["src/SqlServerDockerExample/SqlServerDockerExample.csproj", "SqlServerDockerExample/"]
RUN dotnet restore "SqlServerDockerExample/SqlServerDockerExample.csproj"
COPY . .
WORKDIR "/src/SqlServerDockerExample"
RUN dotnet build "SqlServerDockerExample.csproj" -c Release -o /app/build

FROM build AS publish
RUN dotnet publish "SqlServerDockerExample.csproj" -c Release -o /app/publish

FROM base AS final
WORKDIR /app
COPY --from=publish /app/publish .
ENTRYPOINT ["dotnet", "SqlServerDockerExample.dll"]
Create a docker-compose.yml file for container orchestration
Create a new file named docker-compose.yml in the src folder and add the following content.
version: '3.4'

services:
    db:
        container_name: "SqlServerDatabase"
        image: mcr.microsoft.com/mssql/server:2022-latest
        volumes:
            - ./db-data:/var/opt/mssql/data
        environment:
            MSSQL_SA_PASSWORD: "Password123"
            ACCEPT_EULA: "Y"
            MSSQL_PID: "Developer" # Editions: Developer, Express, Standard, Enterprise
        ports:
            - "8082:1433"

    web:
        container_name: "BlazorServerApp"
        build:
            context: .
            dockerfile: SqlServerDockerExample/Dockerfile
        ports:
            - "8080:80"
        depends_on:
            - db
        environment:
            DBHOST: "db"
            DBPORT: 1433
            DBUSER: sa
            DBPASSWORD: Password123
The docker-compose.yml file contains two services - web and db, one for the ASP.NET Core Blazor Server App and one for SQL Server. The SQL Server db service is configured to use a Docker Volume to persist the data. We have also setup environment variables for the web service, which can be used internally to form the connection string to connect to the database.
Notice that the web service depends on the db service, which means that the db service will be started first and then the web service will be started. Also note that the web service is configured to talk to the db service using the port 1433, which is the internal port of the db service, instead of the external port 8082.
We will be exploring the entire working in detail, after running the application.
Update Program.cs to use environment variables
Open the Program.cs file in the src/SqlServerDockerExample folder.
var builder = WebApplication.CreateBuilder(args);

// Add services to the container.
builder.Services.AddRazorPages();
builder.Services.AddServerSideBlazor();
builder.Services.AddSingleton<WeatherForecastService>();

var dbHost = Environment.GetEnvironmentVariable("DBHOST") ?? "localhost";
var dbPort = Environment.GetEnvironmentVariable("DBPORT") ?? "8082";
var dbUser = Environment.GetEnvironmentVariable("DBUSER") ?? "sa";
var dbPassword = Environment.GetEnvironmentVariable("DBPASSWORD") ?? "Your_password123";
var dbConnectionString = $"Server={dbHost},{dbPort};Database=SqlServerExample;User ID={dbUser};Password={dbPassword};Encrypt=False;Trusted_Connection=False;";

builder.Services.AddDbContext<AppDbContext>(options =>
{
    options.UseSqlServer(builder.Configuration.GetConnectionString("DefaultConnection"));
    // options.UseSqlServer(dbConnectionString);
});
builder.Services.AddScoped<DepartmentService>();
Note that the necessary values for connection string are retrieved from the environment variables. Retrieve the values from the environment variables and assign them to the variables. In our code, if the environment variables are not set, the default values will be used.
Update the AddDbContext method to use the dbConnectionString variable instead of the DefaultConnection configuration.
var dbConnectionString = $"Server={dbHost},{dbPort};Database=SqlServerExample;User ID={dbUser};Password={dbPassword};Encrypt=False;Trusted_Connection=False;";

builder.Services.AddDbContext<AppDbContext>(options =>
{
    // options.UseSqlServer(builder.Configuration.GetConnectionString("DefaultConnection"));
    options.UseSqlServer(dbConnectionString);
});
Build and run the app
Open a terminal and navigate to the root folder of the project. Run the following command to build the app.
docker-compose build
Once the build is successful, run the following command to start the app.
docker-compose up -t SqlServerDockerExample -d
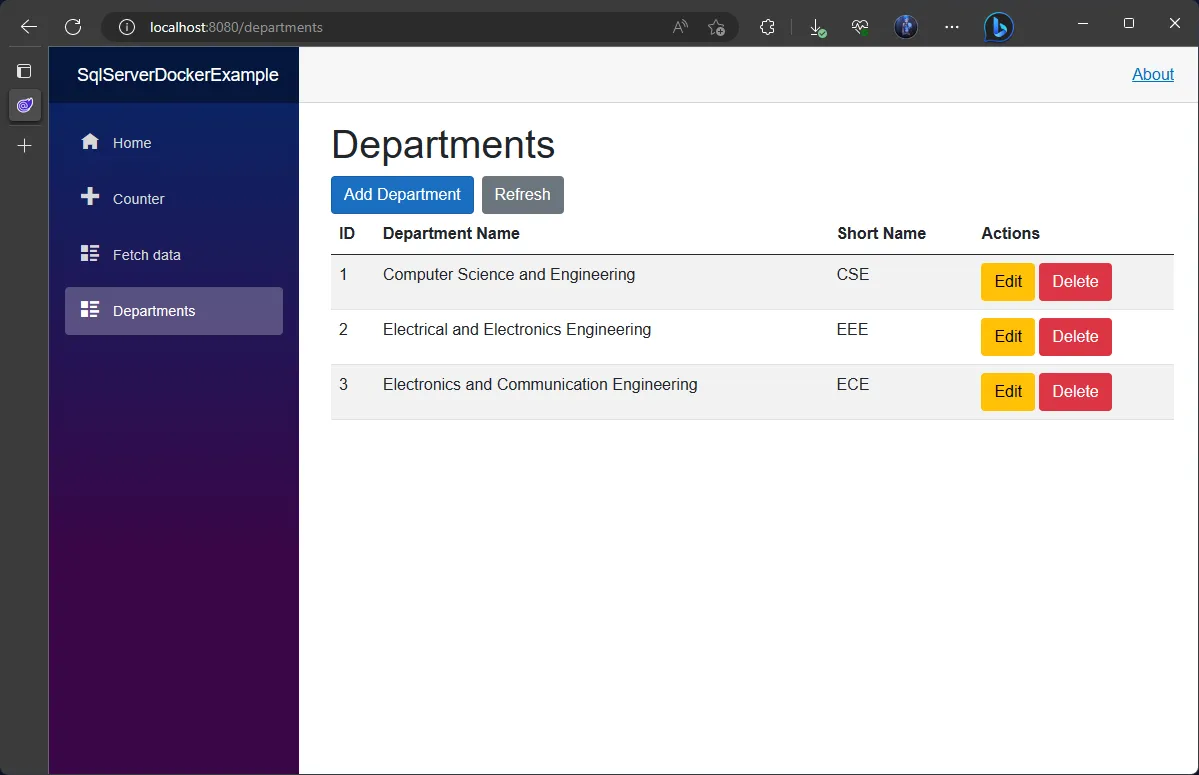
The app should be running now. You can access the app at http://localhost:8080.
Access the SQL Server database
To access the SQL Server database, use the following details:
- Server:
localhost,8082 - Username:
sa - Password:
Password123
Usually, SQL Server databases are managed using SQL Server Management Studio (SSMS). You can download and install SSMS from here.
For demo, I am using JetBrains Rider IDE to access the database. You can use any tool of your choice.
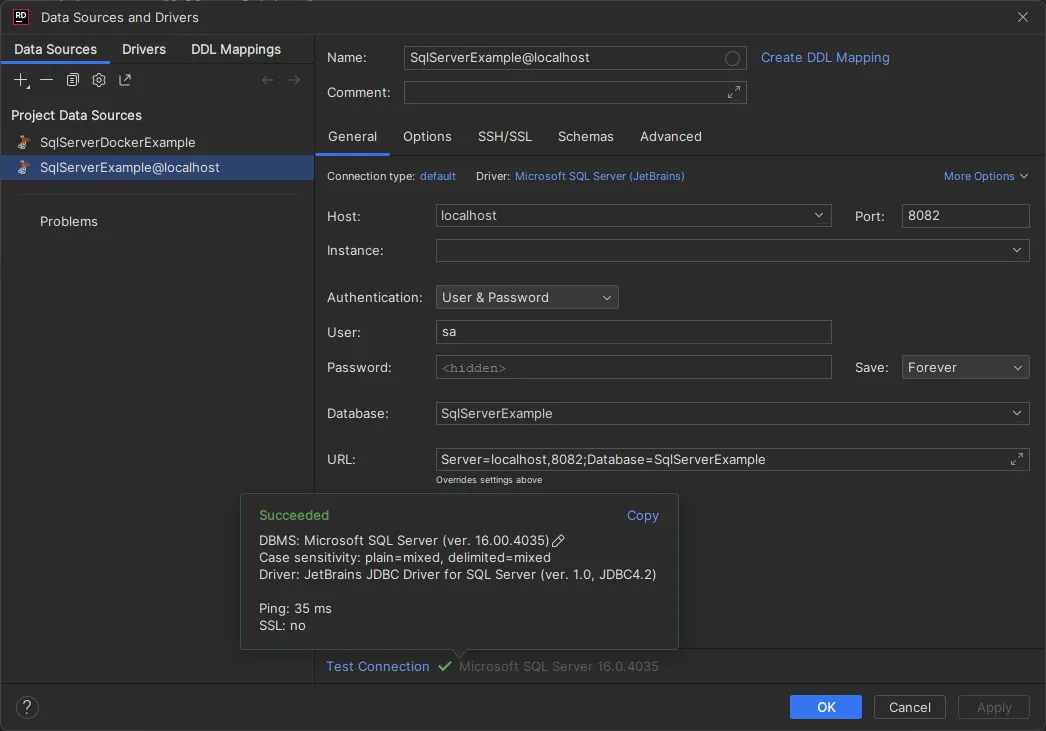

Since we have used a Docker Volume to persist the data, the data will be persisted even after the containers are stopped, destroyed and recreated.
How all this works?
When we run the docker-compose up command, the following happens:
- First the
docker-compose.ymlfile is parsed and the services are created. In our case, thedbservice is created first and then thewebservice is created. - The
dbservice is created using themcr.microsoft.com/mssql/server:2022-latestimage. Thedbservice is configured to use a Docker Volume to persist the data. Thedbservice is also configured to use the port8082to expose the SQL Server database externally. - The Volume
db-datais created and mounted to the/var/opt/mssql/datafolder inside the container. This is where the SQL Server database files are stored. The physical location of the Volume issrc/db-data. - The
webservice is created using theSqlServerDockerExample/Dockerfilefile. Writing a Dockerfile is already covered in our beginner series here. Thewebservice is configured to use the port8080to expose the ASP.NET Core Blazor Server App externally. - The
webservice is configured to talk to thedbservice using the port1433, which is the internal port of thedbservice, instead of the external port8082. This can be explained by the fact, containers that are part of the same network can talk to each other using the internal ports. We didn’t setup any network explicitly, hence Docker Compose creates a default network for us and adds all the services to that network. Thus we are using internal ports for communicating inside internal network. Networking in Docker is quite a separate topic and we may cover it in a separate article in the future. - The
webservice is configured to use the environment variables to form the connection string to connect to the database. The environment variables are set in thedocker-compose.ymlfile, as this is where we configure and manage thewebservice itself. So we are delegating the responsibility of environment variables to thedocker-compose.ymlfile. Then we are programmatically retrieving the values from the environment variables in theProgram.csfile and using them to form the connection string. - The
webservice is configured to depend on thedbservice, which means that thedbservice will be started first and then thewebservice will be started.
After these steps, you’ll have a multi-container application running with SQL Server database.
Wrapping up
In this article, we learned how to create a multi-container application with SQL Server database using Docker Compose. We also learned how to use environment variables to configure the connection string for the database. We also learned how to use Docker Volumes to persist the data. In our upcoming articles, we’ll learn more in-depth about microservices and use the so far learned concepts to create a microservices based application. Thanks for reading and see you in the next article. Cheers!
